Importing data from a file
Introduction
The Data Import feature allows you to read data from external file and put it into your LoginCode database. Current release of LoginCode allows you to import data from the following file formats:
- CSV - a world wide standard which allows to transfer data between various programs.
- LoginCode database - a closed format of LoginCode database which allows to import database backups etc.
LoginCode allows you to import data with the use of Data Import Wizard, an easy to use utility which will guide you step by step through the process of preparation to data import.
To run the wizard, choose LoginCode -> Import data from file from main menu.
Data Import Wizard
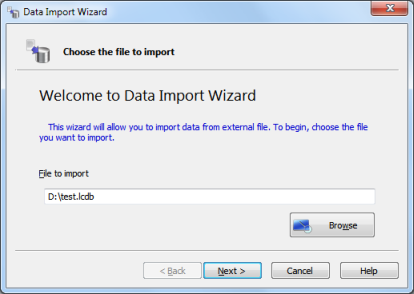
The Data Import Wizard welcomes you with the message shown below. Enter the path of the file, you want to import and press Next to continue.
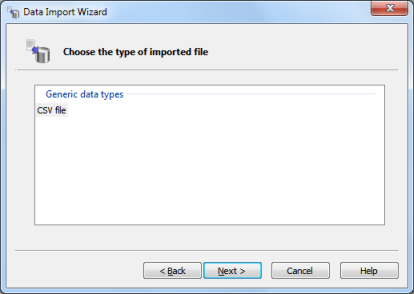
In the next step (see the image below), you will be asked to confirm the type of imported file. In case of importing the LoginCode database, the wizard will automatically detect the file format so this step will be skipped.
The continuation is dependent on the type of selected file so the following description is divided into separate parts.

 The CSV file
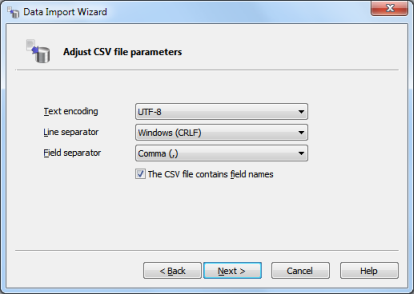
When importing the CSV file, you will be asked to adjust the parameters of the imported file.
The Data Import Wizard detects the file parameters and initially selects them. It may happen however that the detected parameters are incorrect. Therefore we strongly recommend that you carefully review the parameters selected by wizard.
The CSV file parameters include:
- Text encoding - allows you to choose one of available text encodings.
- Line separator - allows you to choose the character or sequence of characters used to separate subsequent lines.
- Field separator - allows you to choose the character used to separate subsequent CSV fields.
- The CSV file contains field names - check this option if the imported file contains CSV column names in the first row.
In the next step, the Data Import Wizard displays the contents of the imported CSV file (see the image below).
We strongly recommend that you ensure that the CSV is displayed correctly. If it is not, please go back to the previous step (CSV file parameters) and correct the parameters of the file.
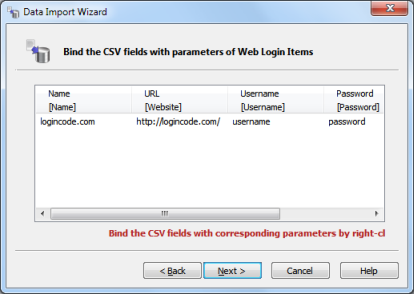
When you review the file contents, bind the CSV fields with item parameters. In other words, specify which CSV fields should be taken into account and what is their meaning. The parameters of items which are imported include item name, login page address, username, user password and item notes.
To bind the field, right-click its column header and choose appropriate item parameter from the context menu. You can also remove the relationship by choosing Unbind command.
When you complete the binding, press Next. You will be moved to the verification step (see the image below). Please, ensure that the presented information is displayed according to your expectations.
When you review the imported data, you can change the name of folder which will contain all imported items. To do it, enter the name in Import folder name textbox. To continue, press Next.
In the last step, the Data Import Wizard will notify you that it has collected all the necessary information and is ready to import the data. Press Finish to close the wizard and commit the import.
The LoginCode database
When importing the LoginCode database, Data Import Wizard may ask you to enter the password for every protected item which is imported. For each item, enter the password and confirm it by pressing Next.
You can also cancel the import of certain item by selecting Skip this item. Additionally, if you select Skip all remaining items which are secured by additional passwords, the Data Import Wizard will omit all remaining items and go directly to the next step.
The image below shows the step of authorization of the imported items.
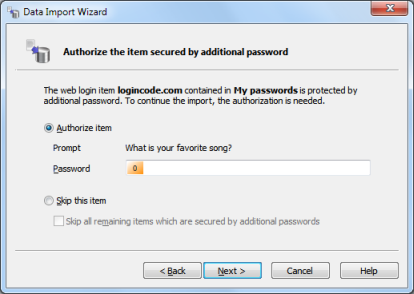
The Data Import Wizard will ask you for the passwords only when the cryptography settings used by imported database differ from those used by your LoginCode database.
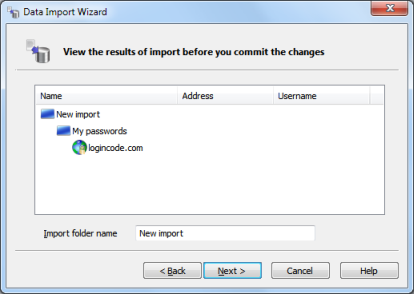
When you complete the authorization, you will be moved to the verification step (see the image below). Review the imported items and ensure that the presented information is displayed according to your expectations.
When you review the imported data, you can change the name of folder which will contain all imported items. To do it, enter the name in Import folder name textbox. To continue, press Next.
In the last step, the Data Import Wizard will notify you that it has collected all the necessary information and is ready to import the data. Press Finish to close the wizard and commit the import.