Exporting data to a file
Introduction
The Data Export feature allows you to store data from your LoginCode database in external file. Current release of LoginCode exports data to the following file formats:
- CSV - a world wide standard which allows you to transfer data between various programs.
- LoginCode database - a closed format of LoginCode database which can be used to create database backups, copy selected parts of database etc.
To export the data, LoginCode features the Data Export Wizard, an easy to use utility which will guide you step by step through the process of preparation the data to export.
To run the wizard, choose LoginCode -> Export database to file from main menu. This command enables you to export a whole database. You can also right-click on any folder in the program main window and choose Export to file from the context menu. In this case you will export the data only from the selected folder.
Data Export Wizard
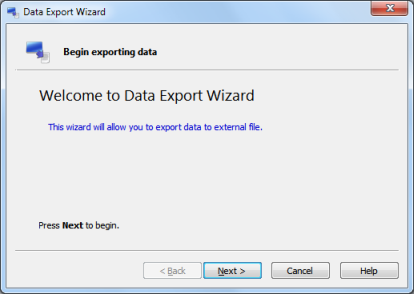
The Data Export Wizard welcomes you with the message shown below. Click Next to begin.
In the next step you will be prompted to choose the output file format. You can choose LoginCode database or CSV file.
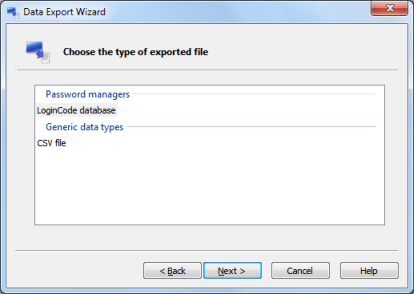
The continuation is dependent on the selected type of output file so the following description is divided into separate parts.

 The CSV file
If the exported items are secured by additional passwords, Data Export Wizard will prompt you to enter the password for every protected item. For each item, enter the password and confirm it by pressing Next.
You can also cancel the export of certain item by selecting Skip this item. Additionally, if you select Skip all remaining items which are secured by additional passwords, the Data Export Wizard will omit all remaining items and go directly to the next step.

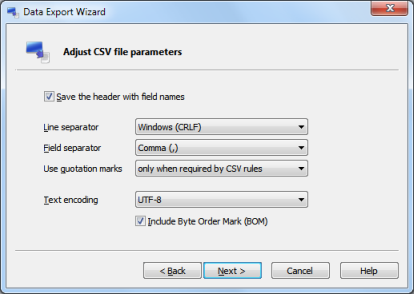
In the next step, you will be asked to adjust CSV file parameters. The Data Export Wizard allows to adjust the following settings:
- Save the header with field names - check this option if you want to save the names of columns in the first row of CSV file.
- Line separator - allows you to choose the character or sequence of characters which will be used to separate subsequent lines.
- Field separator - allows you to choose the character which will be used to separate subsequent CSV fields.
- Use quotation marks - allows you to specify whether the CSV values should be always saved with quotation marks or only when it is necessary. It is necessary to save the CSV value with quotation marks if it contains at least one line separator, field separator, or quotation mark. If the value doesn't contain any of those characters, it may be safely saved without the quotation marks.
- Text encoding - allows you to choose one of available text encodings. In the case of UTF-8, UTF-16 and UTF-16 (big endian), you can additionally check Include Byte Order Mark (BOM) option to save the output file with BOM (Byte Order Mark) header. BOM allows other programs to easily detect the text encoding, you have selected.
In the next step, you are enabled to organize the contents of your CSV file. The Data Export Wizard shows you the contents of the output file in a comfortable preview. The top of the preview is occupied by the header which displays CSV column names and item parameters which are bound to the corresponding columns.
The item parameter which is bound to the column, tells what data will be exported in the corresponding column. It may be item name, website address, username, user password or item notes.
The image below shows the page which allows you to organise the contents of your CSV.
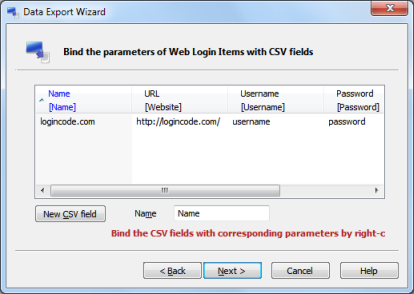
You can easily add new fields, edit or delete existing ones, change the order of columns or change the sorting order of exported data. Below, we have described how to perform some basic operations.
- Add new field - press New CSV field, then enter the field name in the Name textbox.
- Change field name - press and hold the Control key, click on the column, which name you want to change. Then change the column name in the Name textbox.
- Change the item parameter bound to the field - right-click on the column header and choose one of available item parameters shown in the context menu.
- Delete the field - right-click on the column header and choose Delete column from the context menu.
- Change the order of columns - drag and drop the column header to get the proper order.
- Change the sort order of exported data - click on the column by which you want to sort the exported data. To make the order reverse, click the column once again.
Press Next when you complete the organization of your CSV file.
In the next step (see the image below), you will be prompted to specify the path for the exported file. Enter the file path and press Next.
In the last step, the Data Export Wizard will notify you that it has collected all the necessary information and is ready to export the data. Press Finish to close the wizard and commit the export.
The LoginCode database
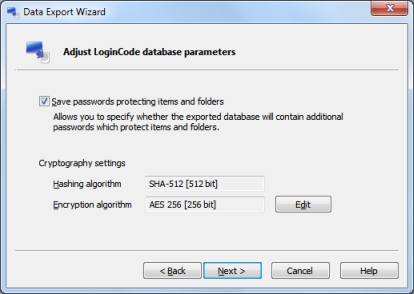
The export to LoginCode database begins with the setup of database properties.
By checking Save passwords protecting items and folders, you can specify whether the exported items should be saved with or without the additional passwords.
You can also modify the cryptography settings for exported database. To do it, press the Edit button and choose appropriate hashing and encryption algorithms. You can learn more about cryptography settings at Encryption Algorithms topic.
Press Next when you complete the setup of database properties.
In some circumstances, the Data Export Wizard will prompt you to enter the additional passwords protecting the exported items. You will be prompted to enter those passwords if at least one of the following conditions is fulfilled:
- you have unchecked the Save passwords protecting items and folders in previous step - in this case the Data Export Wizard needs the passwords to decrypt the protected items and store them in a nonencrypted form.
- you have changed the cryptography settings - in this case the Data Export Wizard needs the passwords to decrypt the protected items and then to encrypt them back using the selected cryptography settings.
While providing the passwords, you can cancel the export of certain item by selecting Skip this item. Additionally, if you select Skip all remaining items which are secured by additional passwords, the Data Export Wizard will omit all remaining items and go directly to the next step.
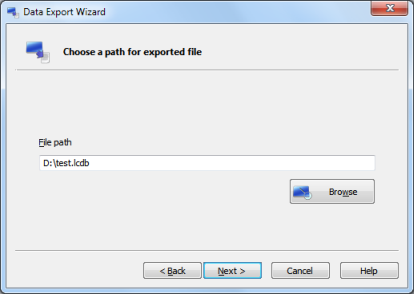
In the next step (see the image below), you will be prompted to specify the path for the exported file. Enter the file path and press Next.
In the last step, the Data Export Wizard will notify you that it has collected all the necessary information and is ready to export the data. Press Finish to close the wizard and commit the export.